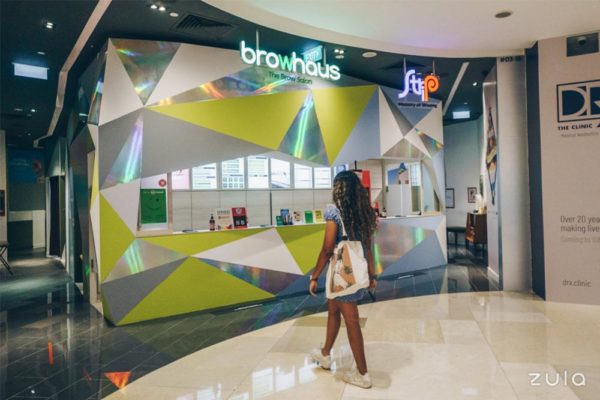
ZULA Team Tries: Browhaus’ Brow Lamination
Besides dance challenges and fashion hacks, TikTok is also known for viral makeup trends. One of the app’s biggest trends in 2020 was soap brows, which involves shaping your brows using a bar of soap so they look full and fluffy. If your screen time is mostly spent on Instagram, you’d also have seen the look on celebs like Gigi Hadid and Dua Lipa. But, let’s be real. Who has the time or patience to groom their brows with soap every morning? That’s where Browhaus’ Brow Lamination comes in.
The non-invasive 3-step treatment is a brow perm that lasts for up to 4 weeks. It uses a perming solution to sculpt and lift the brows, as well as fill in small gaps for fuller, thicker brows.
To put this claim to the test, we asked 5 of our colleagues, each with different brow types and concerns, to review Browhaus’ Brow Lamination service. Before the treatment, each of them also went for a brow shaping session to kick-start their brow makeover journey. Read on to find out if they managed to achieve the trendy, full and feathery brow look taking over social media.
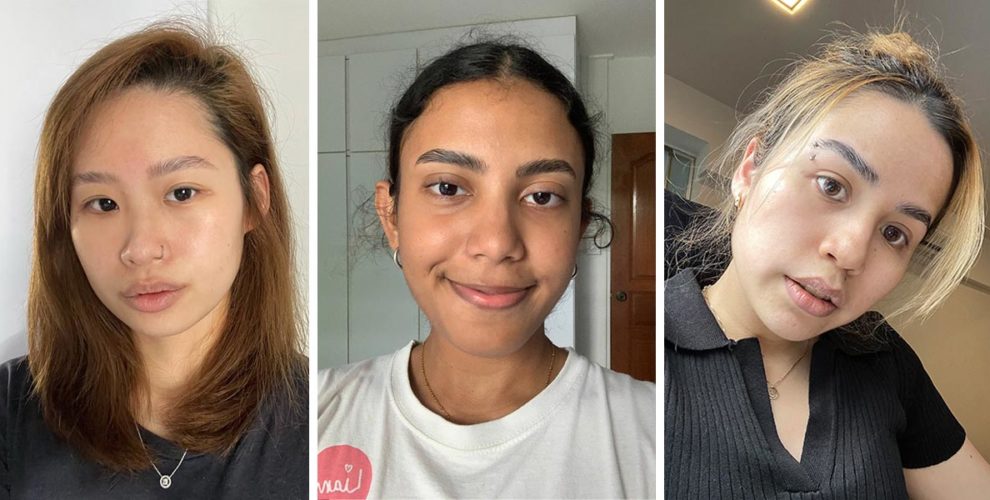
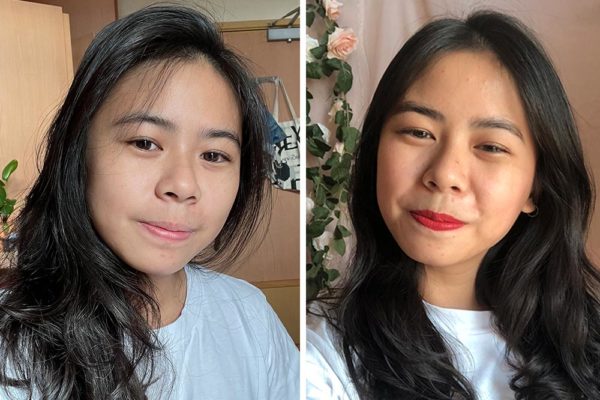
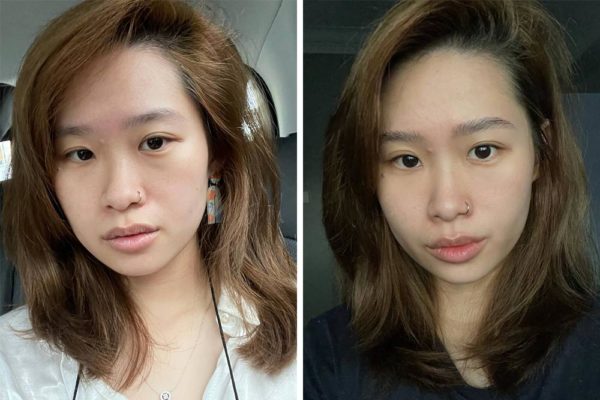
1. Chloe
Current eyebrows and expectations
Before Brow Shaping and Brow Lamination + Colour Tweak (Brow Tint) + Tweezing
“My brows are quite substantial but sometimes grow out of control. In the past, I put in a bit more effort to maintain my eyebrows. But nowadays, I don’t do much to them.
I grew up in the days of Michelle Phan and Zoella, so a big part of where I learn new makeup looks is on YouTube. I also often turn to Instagram to spot new makeup trends. I’ve seen celebs like Gigi Hadid rocking soap brows, and have been wanting to try them.”
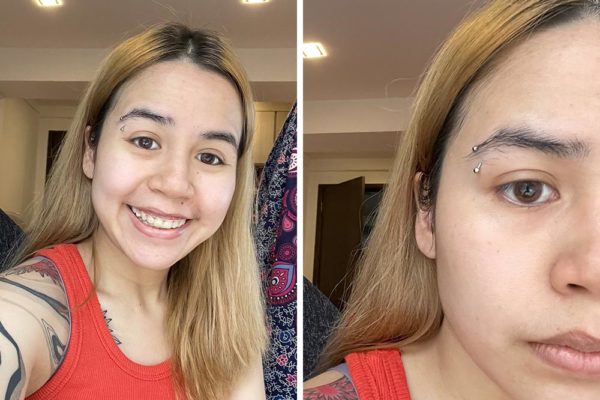
First impressions
3 hours after Brow Lamination + Colour Tweak (Brow Tint) + Tweezing
“During the consultation, the therapist explained to me what was going to happen during the treatment and what I could expect at the end of it. She traced the shape of my brows out using her fingers to show me what it’d look like and asked if I was okay with it.
First, she applied a cream to soften my brow hairs, brushing them in an upward motion before covering them in cling wrap. The process felt really nice because I’ve never taken such good care of my brows, and it was fairly relaxing.
After applying the setting cream, she showed me how my brows would look, before allowing my eyebrows to set in place.
Not gonna lie, I was initially shocked with the results, but I knew that it was going to be temporary. My brows looked fuller and darker, and the angles were more defined.”
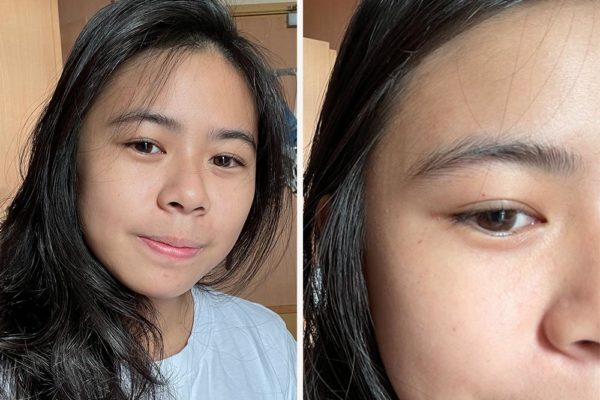
Day 7: Final thoughts
Before vs 7 days after Brow Lamination + Colour Tweak (Brow Tint) + Tweezing
“Although the initial results were quite dark, the look immediately softened after the first wash and became much more wearable! After the tint washes out, you get bolder brows that frame your face well. But the look isn’t too crazy that it gets uncomfortable even if you’re barefaced.
Using the Undercoat Lash & Brow Conditioner helps to tame my eyebrows and enhance the look. It’s a simple step to do first thing in the morning and right before I sleep. It also dries fairly quickly, so my lashes and brows don’t feel clumpy.
I love my brows now, they look full and lush. My partner has repeatedly told me that he likes it too. I also got many compliments from my friends asking me what I’d done to my eyebrows.
With the brow lamination, I’ve learnt to be more confident and rock a red lip even on a regular day just because I’m feeling it. And, I’m not usually a liquid eyeliner kind of girl, but have slowly been experimenting to see what kind of looks I can create.”
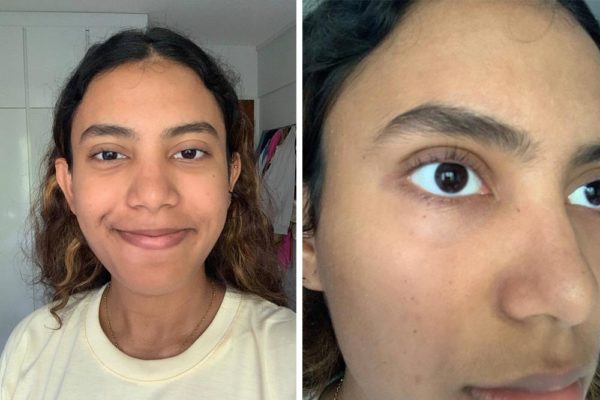
2. Kimberly
Current eyebrows and expectations
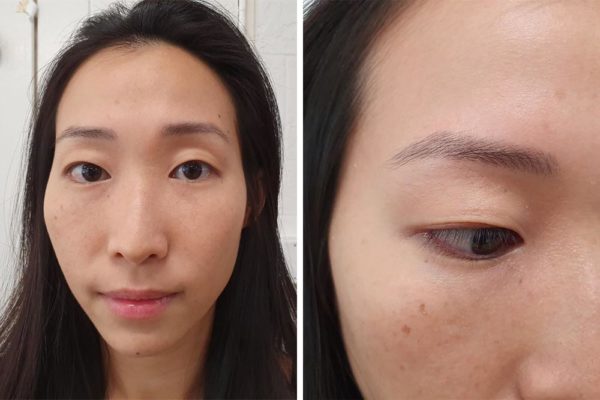
Before Brow Shaping and Brow Lamination + Colour Tweak (Brow Tint) + Tweezing
“Since I had brow embroidery done around 2 years ago, I got lazy to upkeep my brows. I hardly ever pluck or trim them. My biggest struggle is getting rid of all the stray hairs that ruin the shape grooming gives you.
I’ve always dreamed of having thick and full brows. However, my genetics have prevented me from achieving that.
I’m a stay-home-mum who’s working full-time with a chaotic schedule, so makeup and skincare have taken a backseat. I think having fuller, more natural-looking brows for 4 weeks will boost my confidence when I start my day.”
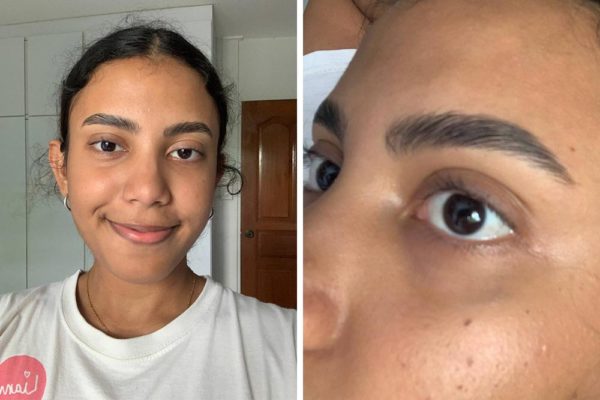
First impressions
3 hours after Brow Lamination + Colour Tweak (Brow Tint) + Tweezing
“Because of my previous eyebrow embroidery, there wasn’t much measuring to be done since the shape was already there and we were just going to follow it.
The process itself was simple and painless. I even dozed off for a bit. There was no immediate pain or discomfort through the 3 steps. In fact, I didn’t even know they’d applied the tint until I was told.
When my new brows were unveiled, it was love at first sight. I thoroughly loved my fluffy, feathery brows. While [my previous] embroidery gave me the illusion of darker, well-shaped brows, brow lamination gave me the natural-looking bushy brows I’d always dreamed of. There was no redness at all, and I went on to have dinner where no one realised [I had done my brows].”
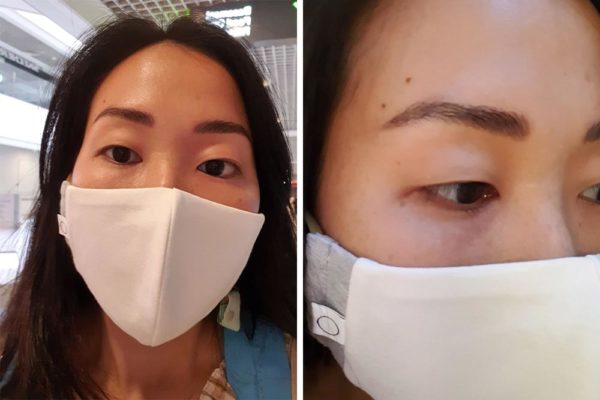
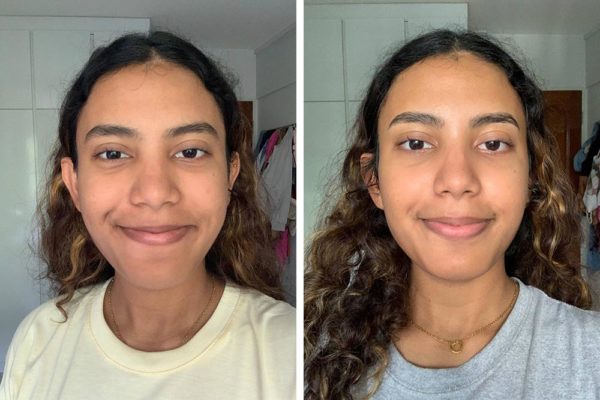
Day 7: Final thoughts
Before vs 7 days after Brow Lamination + Colour Tweak (Brow Tint) + Tweezing
“The brow lamination exceeded my expectations by a mile! I was singing praises of it to any woman who texted me on the lamination day itself. At least 3 people said my brows were on fleek.
My brows are still feathery, though the styling with the conditioner does take an extra 30 seconds or so. That being said, I no longer have to shade in my brows with a pencil—something I’m immensely grateful about—so I guess I am saving time on styling my brows after all. The Undercoat Lash & Brow Conditioner is a nifty product that doubles as a styling cream. Thanks to the intuitive mascara-like design, it’s very easy to apply.
The brows make me feel better leaving the house without makeup. I’m quite lazy with putting on makeup and brow lamination simplifies the process for me.”
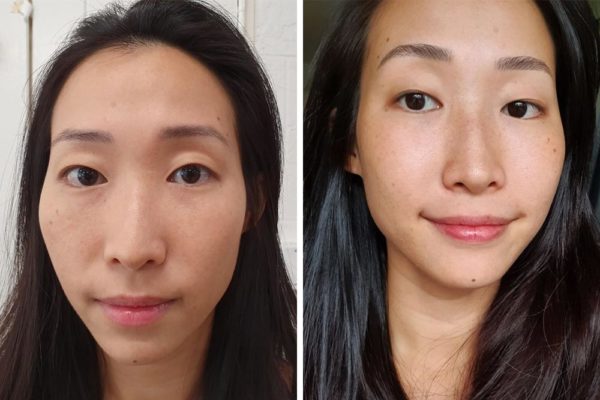
3. Leah
Current eyebrows and expectations
Before Brow Shaping and Brow Lamination + Tweezing
“My eyebrows are naturally thick, but I don’t do anything to them on the regular because I’m way too lazy. I just pluck when I feel like they’re getting too out of hand, but up close, they are pretty unkempt. While my brows are thick, some areas are slightly sparse, so I do have to fill them in if I’m heading out.
As a producer and host, my schedule is packed with shoots and Zoom meetings. Having fuller, fluffier brows for 4 weeks would mean not having to worry about my brows from the time I wake up to whenever I have to go in front of the camera, whether it’s to host a Zula segment or even streaming on Twitch.”
First impressions
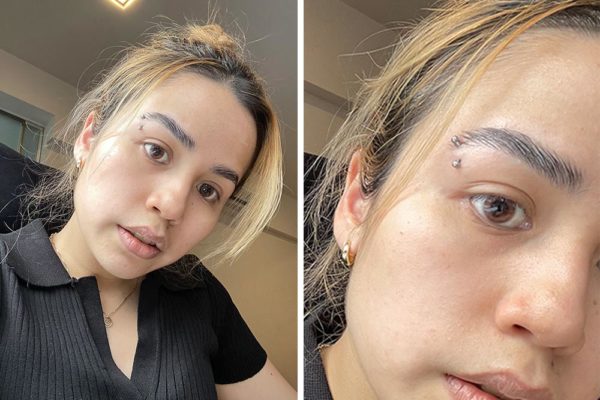
3 hours after Brow Lamination + Tweezing
“I have an eyebrow piercing, which I had to take out before the treatment. I also had some bumps and pimples around the area, so the therapist had to make sure it was fine for me to continue with the process.
When she was lifting the brows, it felt like she was combing them at first. Having my brows covered with cling wrap was a unique feeling, as if I was going for a brow facial.
The cream was pretty cooling, and there was no pain at all. When she moisturised my brows and used her fingers to rub in the cream, it felt like a mini massage, which I really enjoyed.
Lastly, the therapist taught me how to style my brows at home. She also helped tweeze any remaining stray hairs.
I was concerned it might end up looking too “Angry Bird”, but it was very natural. I love how the lamination filled up some gaps I had in my right brow, so I don’t have to draw my brows to fill it in anymore. It looks cleaner, neater and fuller, with the hair going in one direction.
There was no downtime, except you can’t wash your face or let your brows touch water for 24 hours, which was pretty easy to do, and not wear makeup around that area.”
Day 7: Final thoughts

Before vs 7 days after Brow Lamination + Tweezing
“My makeup routine has changed because I don’t have to draw my brows anymore. I just use the gel to make my brows neat. And they’re still full, which I appreciate.
The conditioner is straightforward to use, just like a brow gel. It takes some time to get the exact shape you want but after you apply it, the gel hardens a bit to keep all the stray hairs in check.
When it comes to makeup; I like to stick to what I’m used to and I’m lazy. If I could look good in less time, I would. Since my brows are already bold and defined after Browhaus’ Brow Lamination, I don’t have to apply makeup and I already look pretty put together, which is great.”
4. Ariel
Current eyebrows and expectations
Before Brow Shaping and Brow Lamination + Colour Tweak (Brow Tint) + Tweezing
“My eyebrows are a bit overgrown and I haven’t shaped them in a while. One of my brows is more arched and shaped, while the other is shorter and thicker. My issue has always been trying to make them identical.
I’ve heard of soap brows before and I love Shay Mitchell’s eyebrows. Her brushed-up brows look very natural and feathery, without being too arched or too straight.
I think having fuller brows would shape my face better and make me feel more confident. Not to mention, it’ll also help me get ready quicker, so I can just dash out of the house when I’m late.”
First impressions
3 hours after Brow Lamination + Colour Tweak (Brow Tint) + Tweezing
“There wasn’t any pain or discomfort during the entire process! Before proceeding with the brow tint, the brow therapist recommended a neutral brown colour [to match] my hair, and we went with that.
My brows were slightly red from the tweezing and they advised me not to put makeup first so it was a bit red for a while after, but nothing too bad. There was no no soreness or pain after too.
My first thought was that my brows were really thick. They’re more defined and full, and because they were brushed upwards, they look more feathery as well, which was what I wanted. There wasn’t any downtime and I just carried on with the rest of my day as per normal.”
Day 7: Final thoughts
Before vs 7 days after Brow Lamination + Colour Tweak (Brow Tint) + Tweezing
“My brows are still full and feathery. I do think Brow Lamination lived up to its claims. And, the process was painless and quick, which I thought was a great bonus. It helped with my previous brow struggles too, as going for the brow shaping before the lamination made my brows look similar.
I highly recommend getting the Undercoat Lash & Brow Conditioner if you’re doing the Brow Lamination. It feels moisturising and doubles up as a styling gel, so I can care for and shape my brows at the same time.
I spend less time on my brows now, as I’ve been brushing and shaping them rather than drawing. I do feel more confident in my bare face and I’m more likely to leave the house without putting on any makeup.”
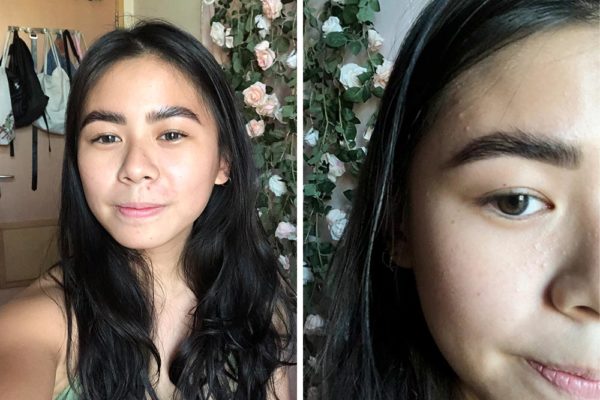
5. Shash
Current eyebrows and expectations
Before Brow Shaping and Brow Lamination + Tweezing
“My eyebrows are thick, but they’re uneven and the shape isn’t really defined. I have to thread them every 1.5 to 2 months if I want them to look their best. So if I don’t thread them in time, they just look very thick and shapeless.
I’ve heard about soap brows after seeing them on TikTok, and I’d like to have a more defined arch and feathery brows. They look effortless and natural, which would free up the time spent taming my brows in the morning.”
First impressions
3 hours after Brow Lamination + Tweezing
“I would describe [the process] as if someone was stretching your eyebrow area out, but I felt no pain or discomfort at all. There was no redness or soreness, and the whole process was fuss-free. You just have to lay there and relax for 45 minutes and then boom, new brows!
Honestly, I was quite shocked when I first saw my brows because I thought they looked very different from my normal brows. But after 3 hours, they looked fine. My brows look more defined, full and feathery! They look thicker as well.
I could carry on with the rest of my day normally. The therapist told me to avoid getting water on my brows for the rest of the day, so I used facial wipes to wipe my face (minus my brows) instead of washing my face.”
Day 7: Final thoughts
Before vs 7 days after Brow Lamination + Tweezing
“My eyebrows still look fuller, more consistent and less messy compared to my normal brows. I set them in place in the morning using the Undercoat Lash & Brow Conditioner, which is super easy to use. It really helped that the brow therapist showed me how to apply it after the session.
While I usually lean towards a more natural, no-makeup makeup look, my new brows have made me realise that I can pull off bold looks as well. They make me feel cooler and more fashionable. Since I haven’t tried anything different with my makeup before, it’s fun to see myself look different.”
Browhaus’ Brow Lamination
Each of the 5 girls had varying brow types and concerns, but they all managed to achieve the soap brow look after going through Browhaus’ brow lamination service. Even after 7 days, their brows continued to be full, fluffy and feathery.
Browhaus is a familiar name to most Singaporeans, with many turning to the homegrown brand for brow grooming over the past 16 years. You can rest assured that the skilled therapists are equipped with the tools and know-how to make sure that your brow lamination procedure is comfortable and fuss-free.
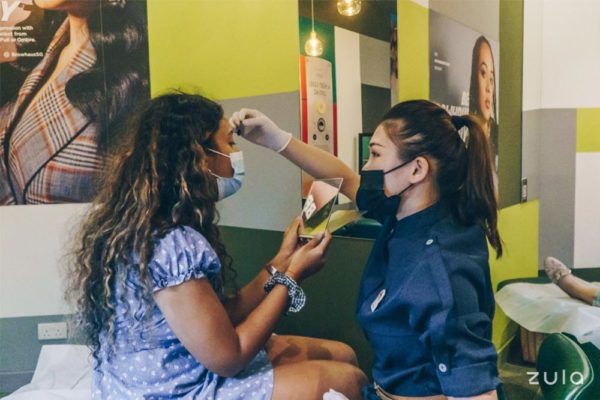
Each treatment begins with a consultation. During the consultation, the brow therapist will go through an evaluation to ensure that your skin is suitable for the treatment. Bumps and pimples around the brow area will be assessed to make sure it is fine to continue with the treatment.
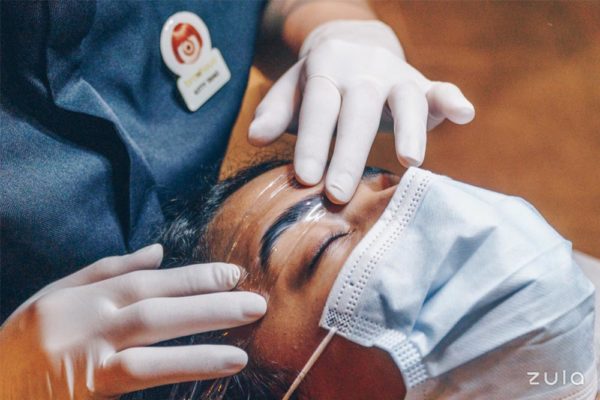
In the first step of brow lamination, your brows are prepped with a cream and covered with cling wrap to soften the brow hairs. It takes around 8 minutes, so you can even sneak in some Zs while you wait.
The brows are then brushed in an upwards motion to fill in small gaps and define arches.
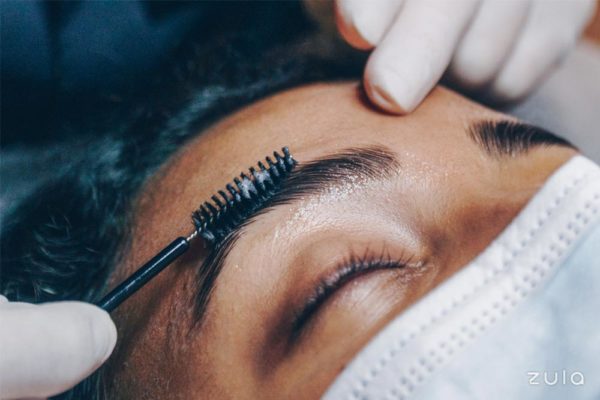
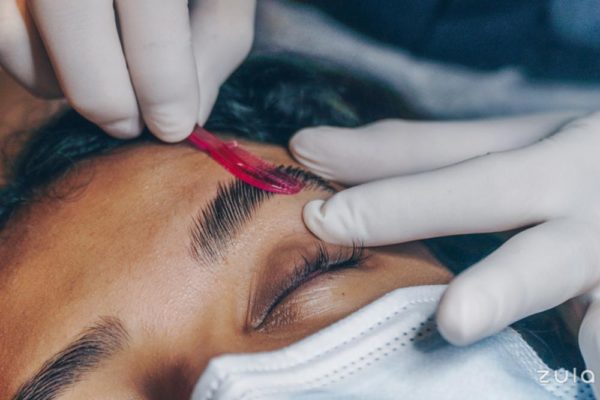
After removing the cling wrap, a neutralising cream is applied. This helps to hold the eyebrows in the desired position.
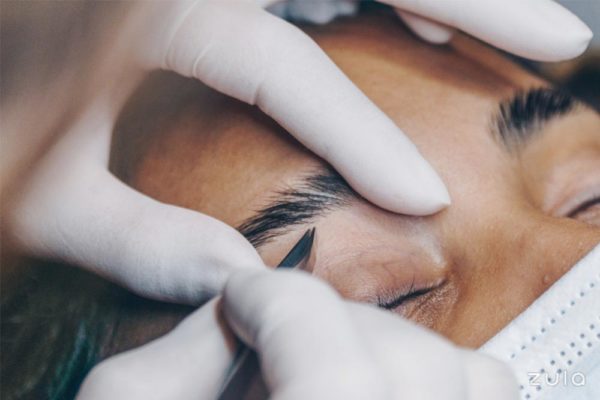
Lastly, it’s time to style the brows. During this step, you can opt for applying a brow tint to enhance and further define your brows. The therapist will then proceed to tweeze the stray hairs on the sides of your brows to make them look sleek and neat.
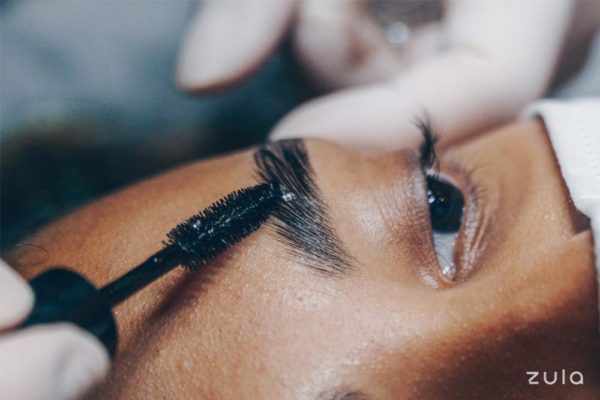
Browhaus’ Undercoat Lash & Brow Conditioner is then used to add the final flourish, to style and nourish the brows. The therapist will also demonstrate different looks you can achieve with the undercoat—brushing the brows straight up for a bold and strong look, or sideways for a softer, everyday look.
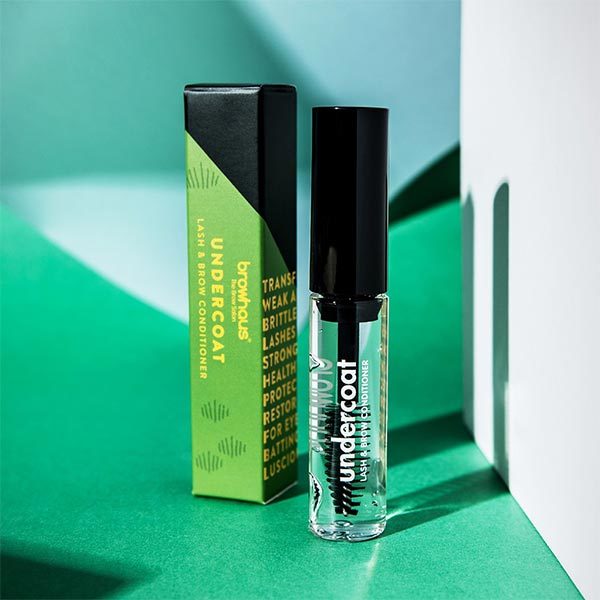
Image courtesy of Browhaus
After the brow lamination service, the therapist will also demonstrate how to apply the Undercoat Lash & Brow Conditioner on your brows every morning and night. This simple step will make sure that your brows will look good for as long as they can.
Think of Undercoat as a leave-in conditioner for both the brows and eyelashes. Containing silk, collagen and vitamin B5, your dry lashes and brows will be effectively moisturised. It also doubles up as a base for mascara.
We Tried Browhaus’ Brow Lamination To Get The Full & Feathery Brow Look Effortlessly
Since masks became mandatory, our eyes have found themselves in the spotlight. If you have naturally bushy brows and would like to make a statement with your brow look, Browhaus’ Brow Lamination might be up your alley.
Browhaus’ Brow Lamination service costs $120, and the additional Brow Tint and Tweezing services cost $160 to enhance your brow look further. Good news: Browhaus is now running an exclusive first trial promotion at $48 for the Brow Lamination, Colour Tweak (Brow Tint) and Tweezing. Now you can get full and feathery brows that last for up to 4 weeks*. It’s never too early or too late to get on-fleek brows just like your favourite celebs!
Sign up for Browhaus’ Brow Lamination today!
*Individual results may vary.
This post was brought to you by Browhaus.
Photography by Natalie Ng.
Also read:
Eyebrows Tutorial: Step-By-Step Guide For Beginners Who Want Natural-Looking Brows In Minutes